CLWP User Guide
-
-
To safely set a Withdrawal address using CLWP, we strongly suggest adhering to a strict security protocol to protect your seed phrase and private data.
We recommend using a bootable USB key with Ubuntu (Linux) flashed to the USB device. It is a very easy solution and will allow you to use an independent and air gapped operating system to create the .json file needed for CLWP to set your withdrawal address automatically when the Shanghai Fork goes live.
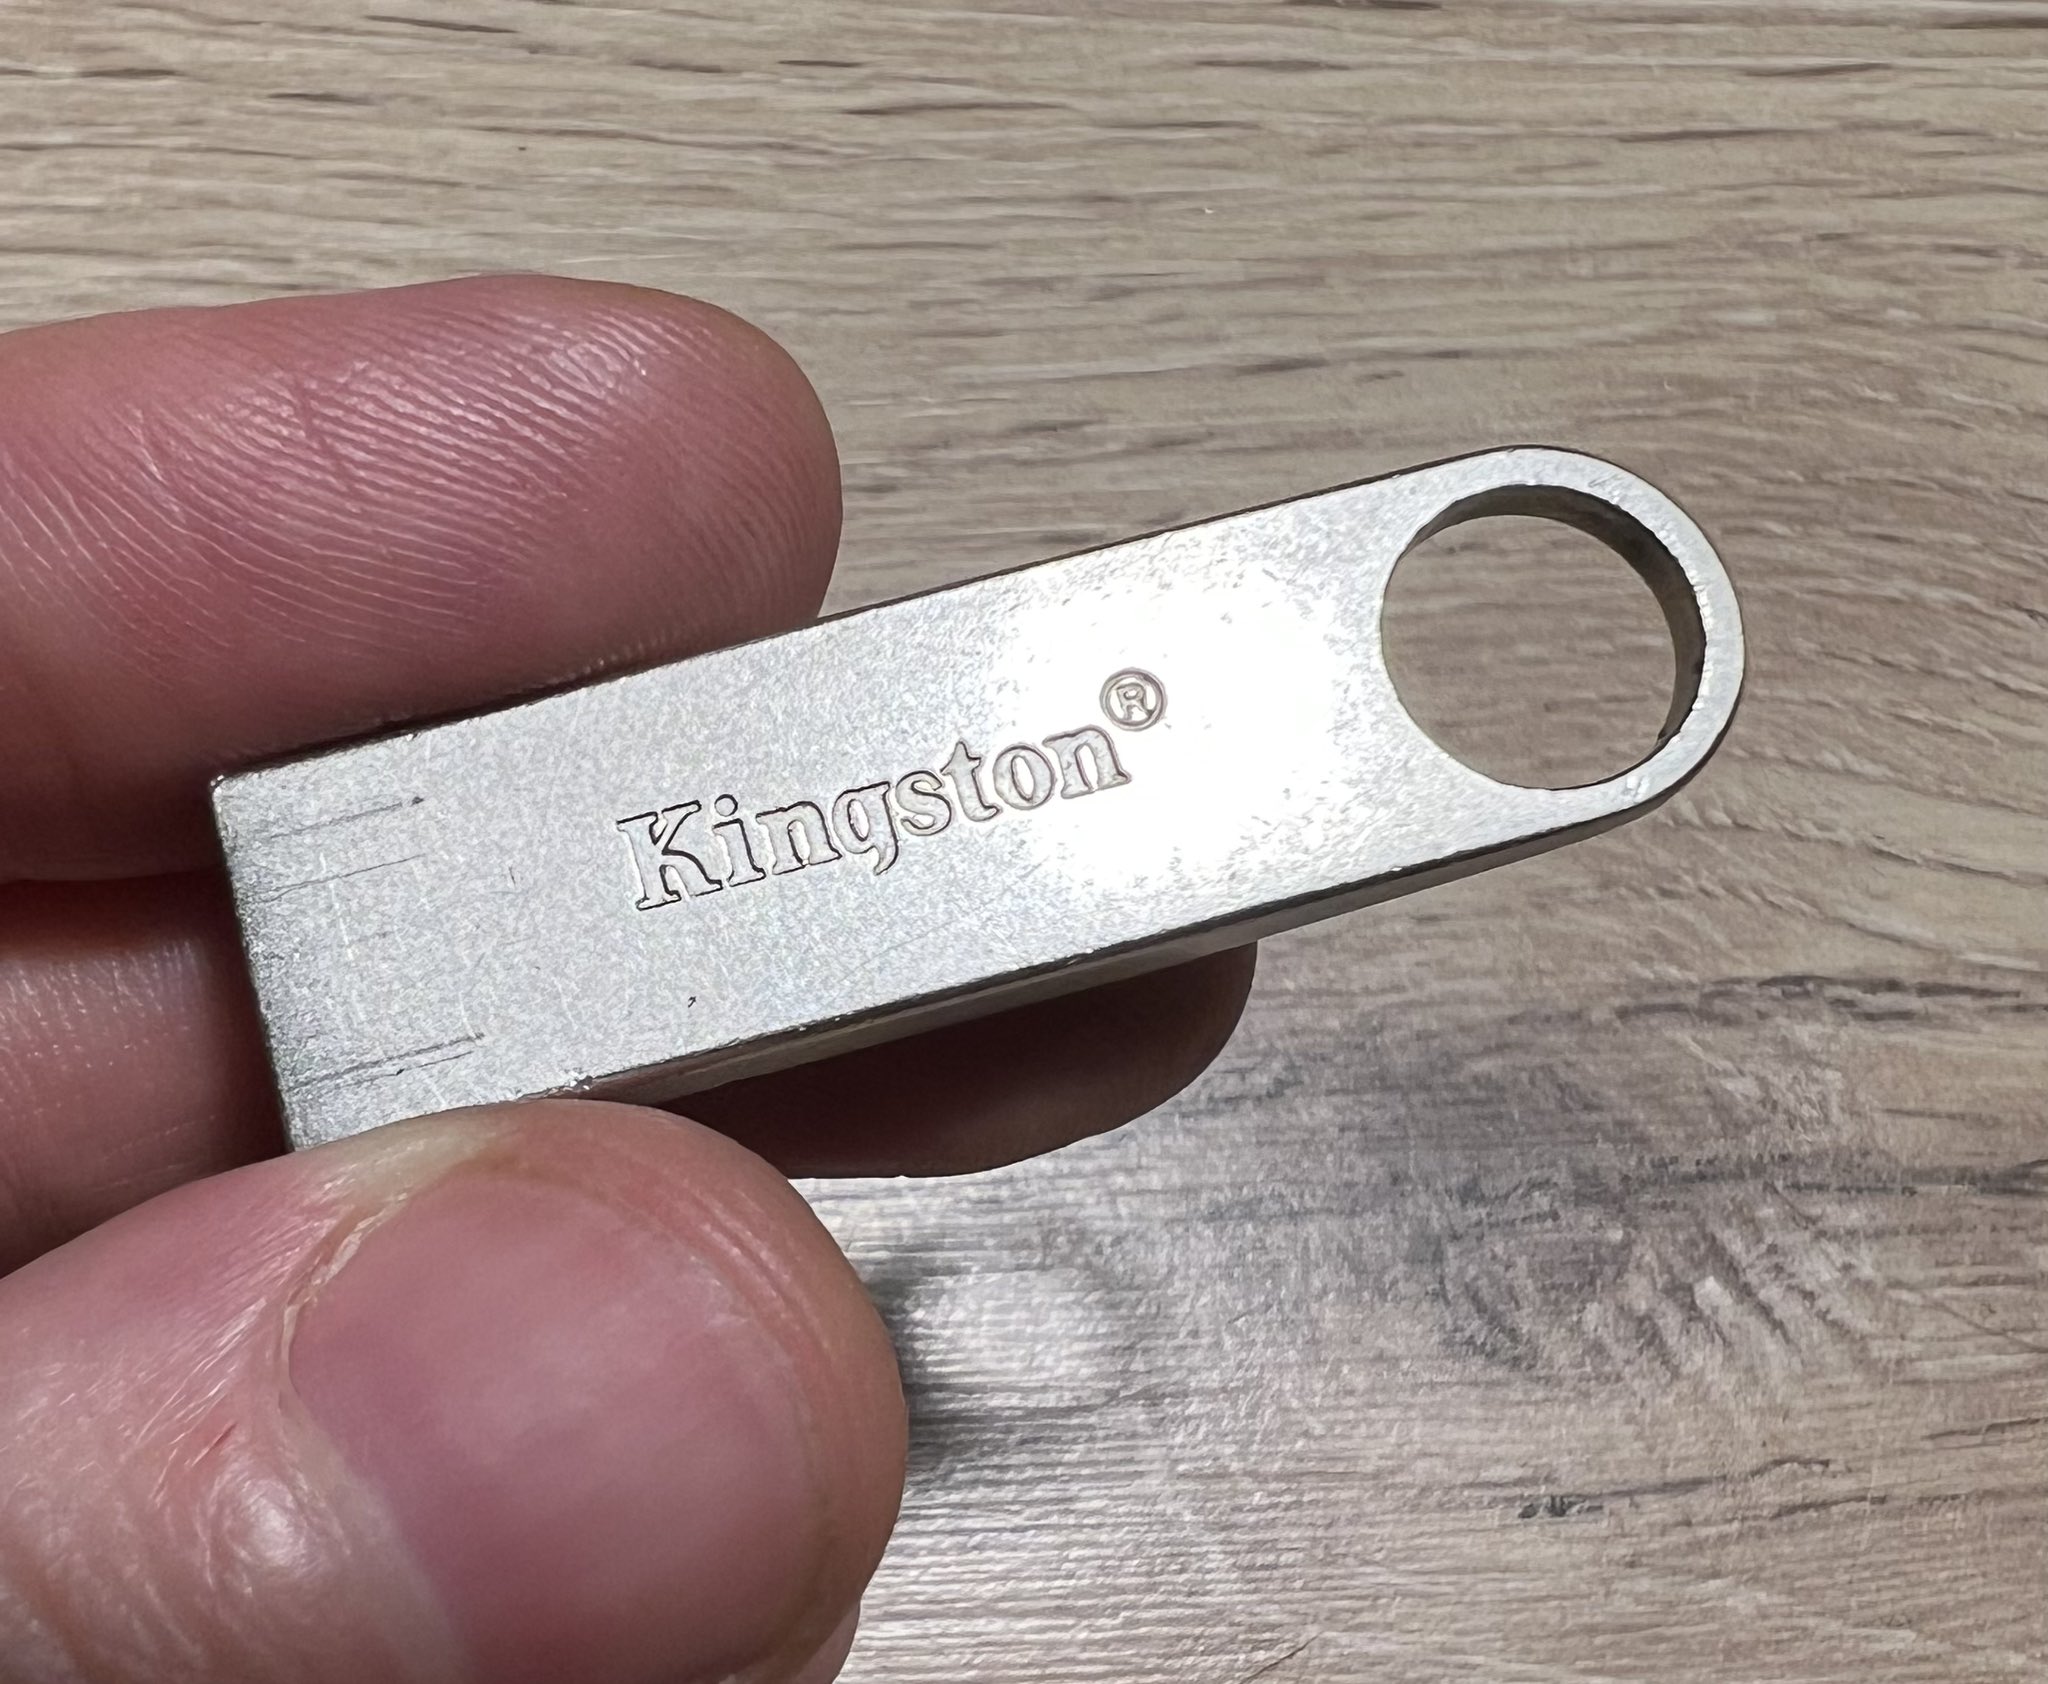
For this example we have used a 64GB USB key. However 8GB should be easily sufficient for the job.
-
For this step you will need to download two software packages. One for flashing the USB key to make it a bootable device, and the other Ubuntu, the operating system we will use to access a secure terminal to run the CLWP command line interface.
Use the links below to download the two packages and let's move to the next step of formatting the USB and preparing it as a bootable device.
- balenaEtcher --> Download link
- Ubuntu Linux --> Download link
Formatting is the process of prepping a storage device, like a hard drive, solid-state drive, flash drive etc, to store information. It creates a filing system that organises your data and allows you to maximise the space for your files. It’s typical to format a drive when a new operating system is going to be used or additional space is required
-
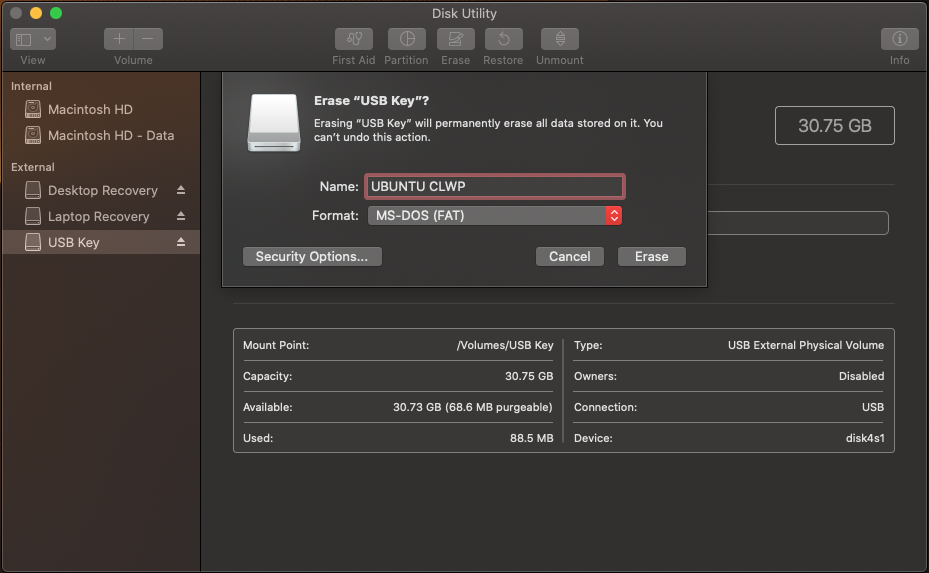
Formatting Drives on a Mac OS 10+
- Insert a USB drive into your USB port.
- Launch “Disk Utility” (from Applications > Utilities > Disk Utility).
- Select the USB drive from the list on the left.
- Select “Erase” at the top.
- Type in a “Name” for the drive, then select a “Format” MS-DOS Fat32 (file system).
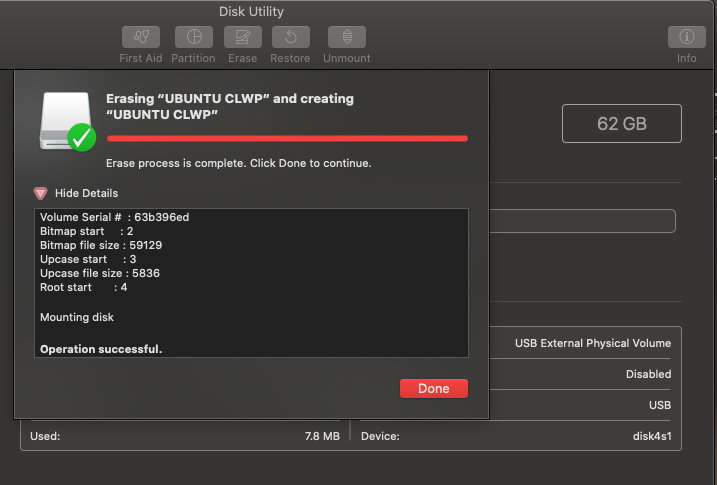
- Select “Erase”.
- Once complete, select “Done”.
- Once format is finished, the USB flash drive will be all set to store documents, pictures, videos, and other files on the removable drive.
Formatting drives in Windows- Open File Explorer.
- Insert a USB drive into a USB port.
- Click on This PC from the left pane.
- Under the "Devices and drives" section, right-click the flash drive and select the Format option.
- Use the "File system" drop-down menu and select the preferred option.
- In the "Allocation unit size" drop-down menu, use the default selection.
- In the "Volume label" field, confirm a drive name that will appear in File Explorer. For example, KingstonUSB.
- Under the "Format options" section, select the Quick format option or don’t depending on the use case.
- Click the Start button.
- Click the Yes button.
- Once format is finished, the USB flash drive will be all set to store documents, pictures, videos, and other files on the removable drive.
-
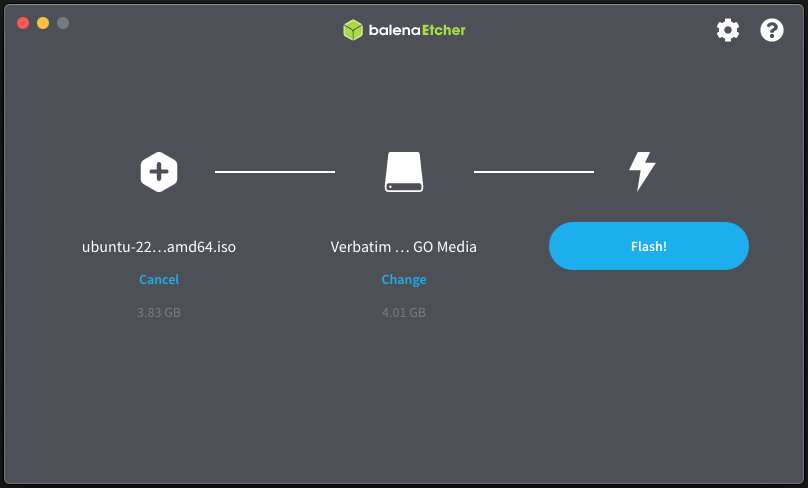
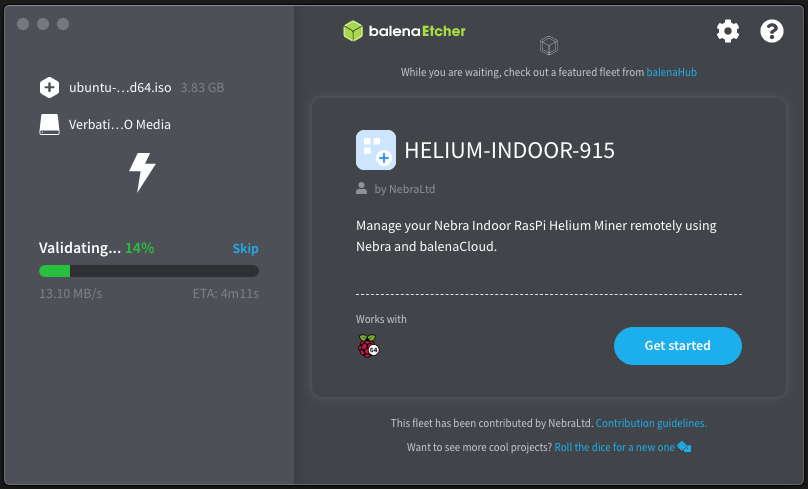
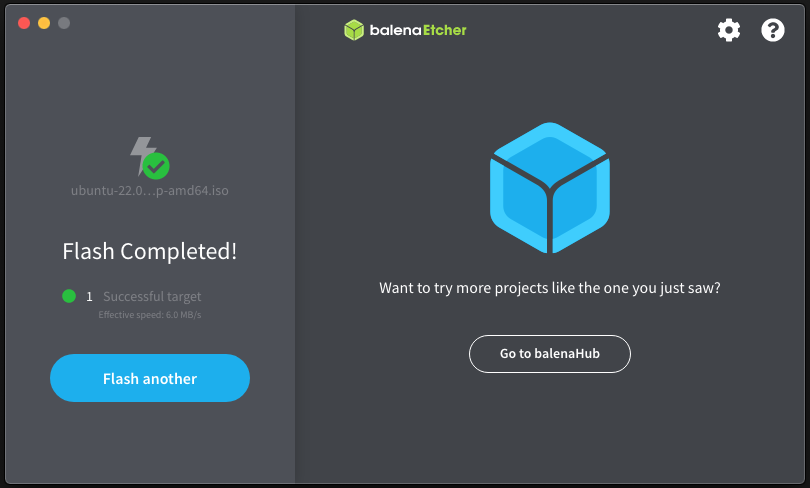
Creating the bootable USB drive could not be easier.
- mount/install/run BalenaEtcher
- Select the Ubuntu.iso you downloaded previously
- Select your freshly FAT32 formatted USB key
- Click "Flash" and wait a few minutes.
- Once the Usb flashed it will validate the image and complete.
You now have a bootable Ubuntu USB key ready to use.
Congratulations! Lets now quickly got to step 5 and prepare the 2nd USB key you will need."
-
When you use the Ubuntu bootable USB key you will not be installing the OS. You can run Ubuntu in test mode. The point of using the bootable USB key is it is isolated from your computer hard disk and is intended to be 100% malware and virus free and it can be air gapped! Ubuntu allows us to boot up directly from the USB key.
This however means you need to prepare a 2nd USB key. This must be inserted into your computer before you boot up Ubuntu, otherwise the key may not be detected once Ubuntu is running in test mode. it will scan the 2nd USB on boot. So with this last step we will get your CLWP set withdrawals files ready.
- Format the 2nd USB Key by following the previous steps in 3: Prepare USB Key.
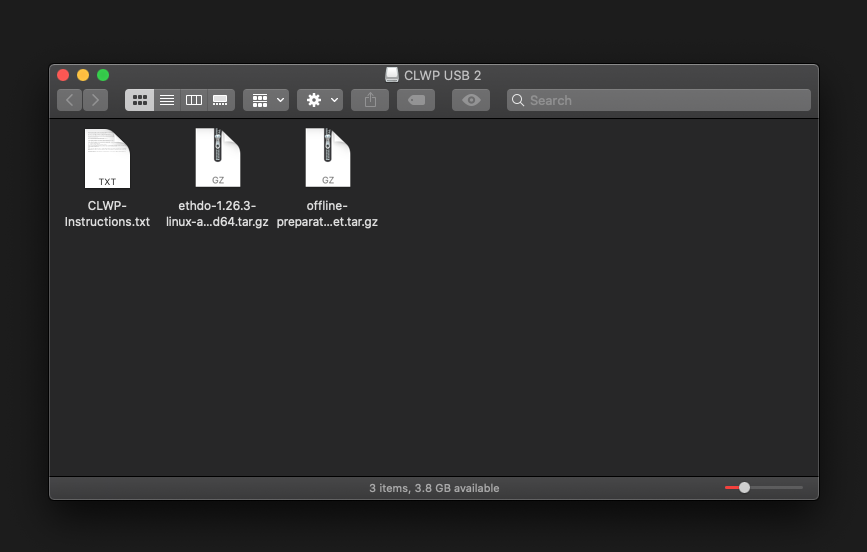
- Download* ethdo, an open source Ethereum command line interface for validators -->Download
- Download an offline list of all the nodes activate on the Beaconchain, we need this because we intend to stay offline (air gapped ) so this list allows you to create the signature for your node/s while offline! -->Download
- Download a .txt instructions file with the commands needed for the CLWP CLI which you can later paste into the Ubuntu terminal -->Download
- Open the .txt file and paste your new/secure public wallet address where it says "paste your new public withdrawal wallet address here" , make sure this is the correct address! Now save the .txt file.
- Lastly, copy all three files to your 2nd USB Key. The USB should now look like the picture below!
*If you use the latest Mac M1 silicon chip you will have to download the ethdo repository manually.
-
-
-
Before we boot up your machine, make sure your OpSec is prepared:
- Remove & Cover all Cameras from work area
- Remove any Ethernet cables from machine you use to boot Ubuntu
- Switch off your wireless hub and put phones in airplane mode
You will need your Validator Node withdrawal keys ready and this is why you want all camera devices well out of the way! We must have the work environment as secure as possible!
-
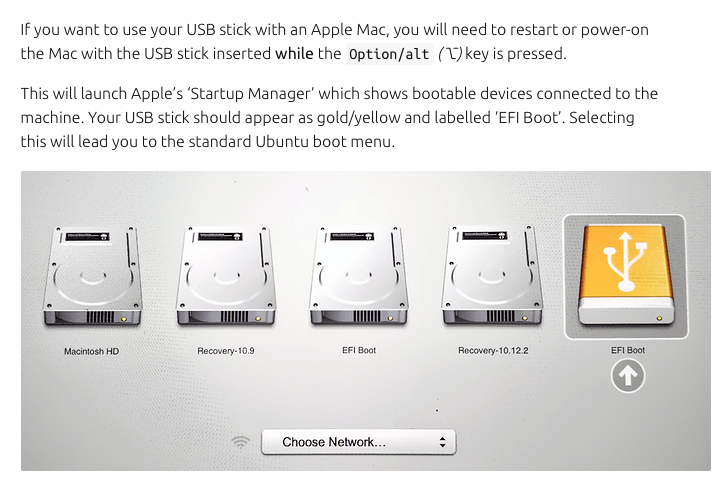
If you using an Apple Mac
- If you are ready insert both USB keys into your offline computer
- On a Mac with Apple silicon*: Press and hold the power button until “Loading startup options” appears.
- If you’re using a Mac mini, wait for the system indicator light to turn amber.
- On other Mac computers: Press and hold the Option key as you press the power button to start up your Mac.
- When you see the available startup disks, select the bootable USB device, do not touch "CHOOSE NETWORK" drop down, this way the device will stay air gapped.
- Then click the Continue button (on a Mac with Apple silicon) or the Up arrow (on other Mac computers)
-
If you are using a PC
To boot from a CD, DVD or USB device, make sure that the device has boot sequence priority over the hard drive.
BIOS (Basic Input Output Subsystem) is a programmable chip that controls how information is passed to various devices in the computer system. A typical method to access the BIOS settings screen is to press ESC, F1, F2, F8 or F10 during the boot sequence.BIOS settings allow you to run a boot sequence from a floppy drive, a hard drive, a CD-ROM drive or an external device. You may configure the order that your computer searches these physical devices for the boot sequence.
The first device in the order list has the first boot priority. For example, to boot from a CD-ROM drive instead of a hard drive, place the CD-ROM drive ahead of the hard drive in priority.
- If you are ready insert both USB keys into your offline computer
- Start the computer and press ESC, F1, F2, F8 or F10 during the initial startup screen. Depending on the BIOS manufacturer, a menu may appear.
- Choose to enter BIOS setup. The BIOS setup utility page appears.
- Use the arrow keys to select the BOOT tab. System devices appear in order of priority.
- To give a USB device boot sequence priority over the hard drive, do the following:
- Move the hard drive device to the top of the boot sequence list.
- Expand the hard drive device to display all hard drives.
- Move the USB device to the top of the list of hard drives.
- Save and exit the BIOS setup utility.
- The computer will restart with the changed settings.
- Boot Priority Options
"Some computer manufacturers allow you to select the device that contains the boot sequence from a special device selection menu. The example below uses a Dell system board."
To set boot priority using a device selection menu:
- When the computer starts to boot up, after the manufacturer's ID screen, press F12 several times. The device selection menu appears.
- Use the up and down arrows to select CD-ROM or an USB Flash Drive.
- To boot from the selected device, press ENTER.
Note: Using an incorrect BIOS setting can cause a system malfunction. Please follow the BIOS guide provided with your computer motherboard. If you read these instructions and you are not sure how to change a setting, it is better to leave it as the default setting.
Full Credit for this PC tutorial goes to MDTechVideos
-
Now you have successfully booted from your USB key, there is one last simple step.
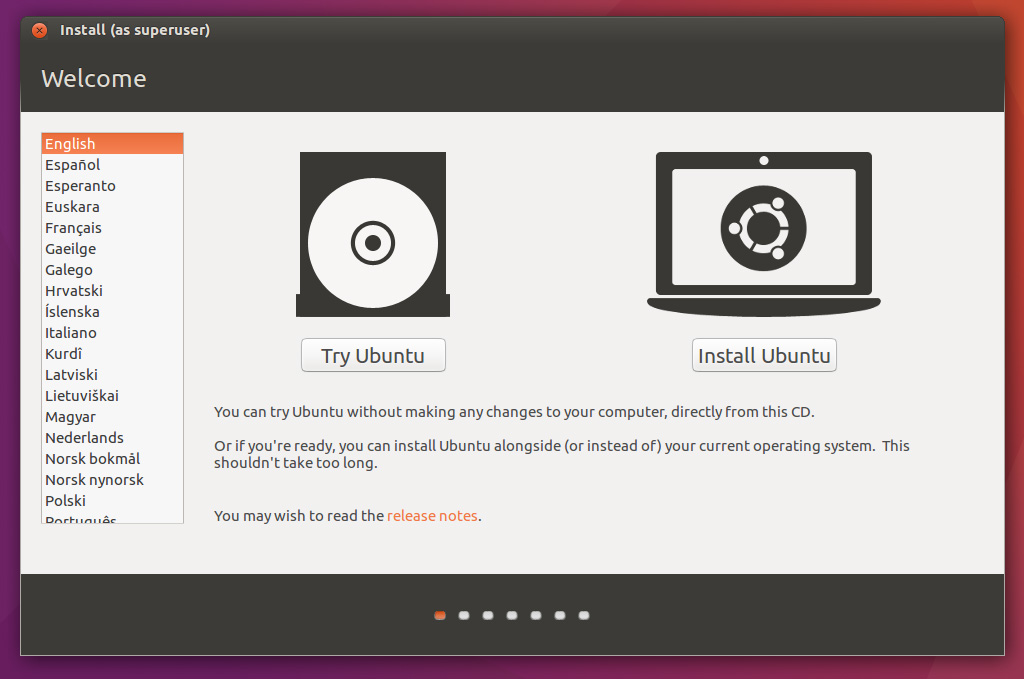
- The first thing you will be presented with is a black boot up screen and install list. Click the first option *Try or Install Ubuntu
- On the preceding screen, select " Try Ubuntu" DO NOT install Ubuntu as we want to work with a test OS directly from the USB key. This is very important for security.
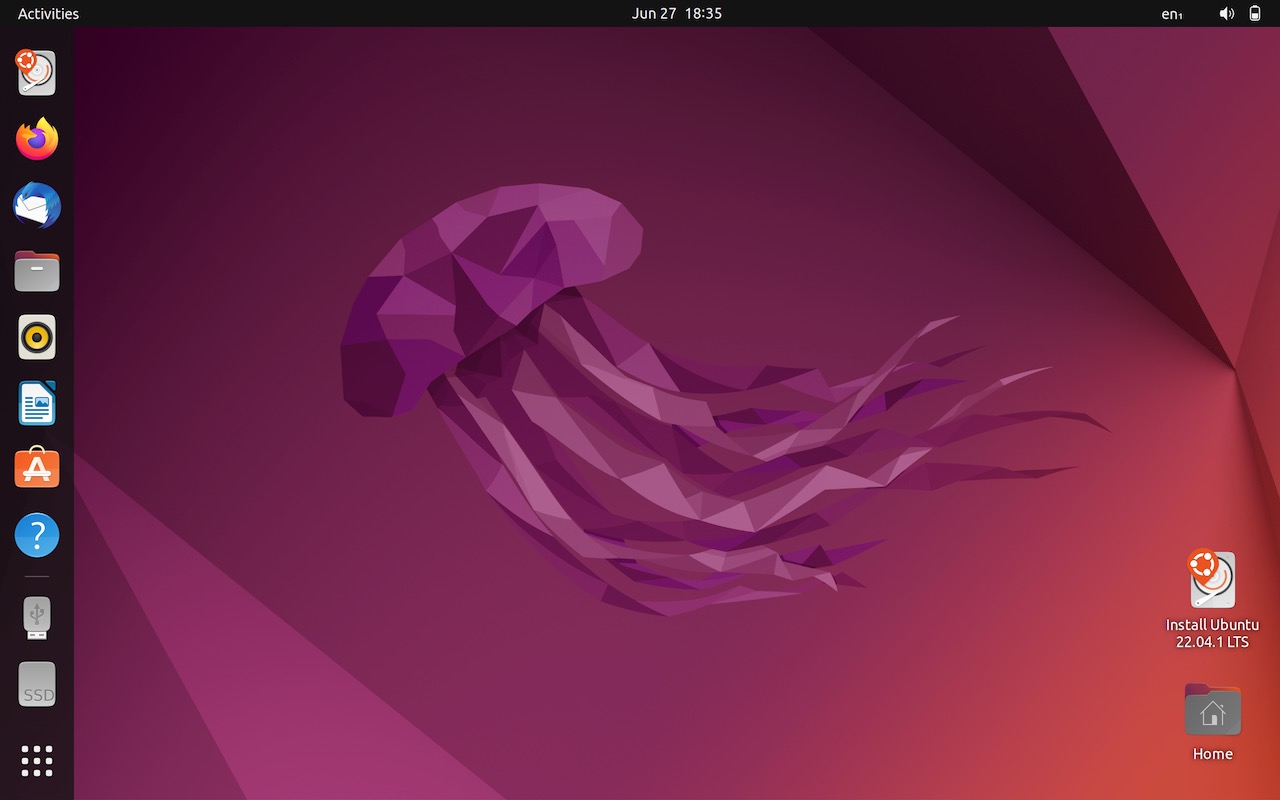
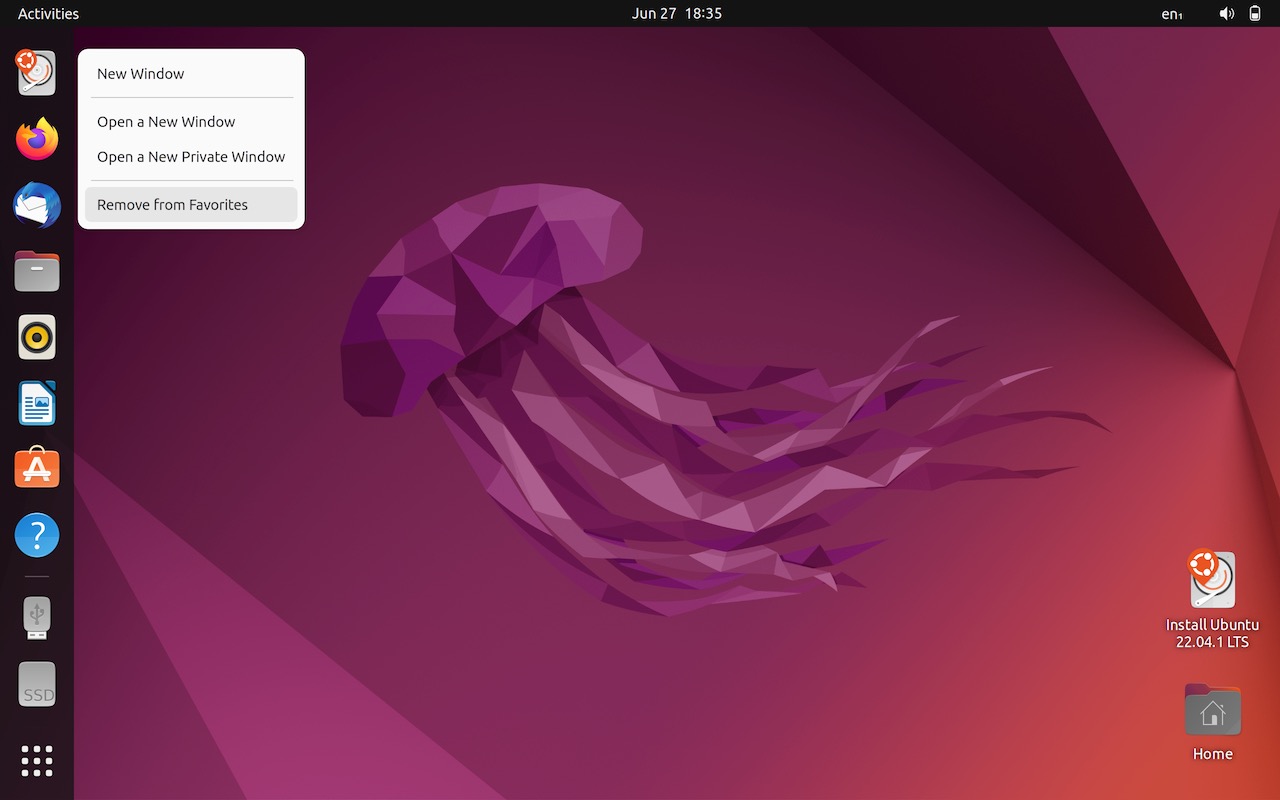
- Wait a few minutes and with luck you will boot up and be presented with the screen below.
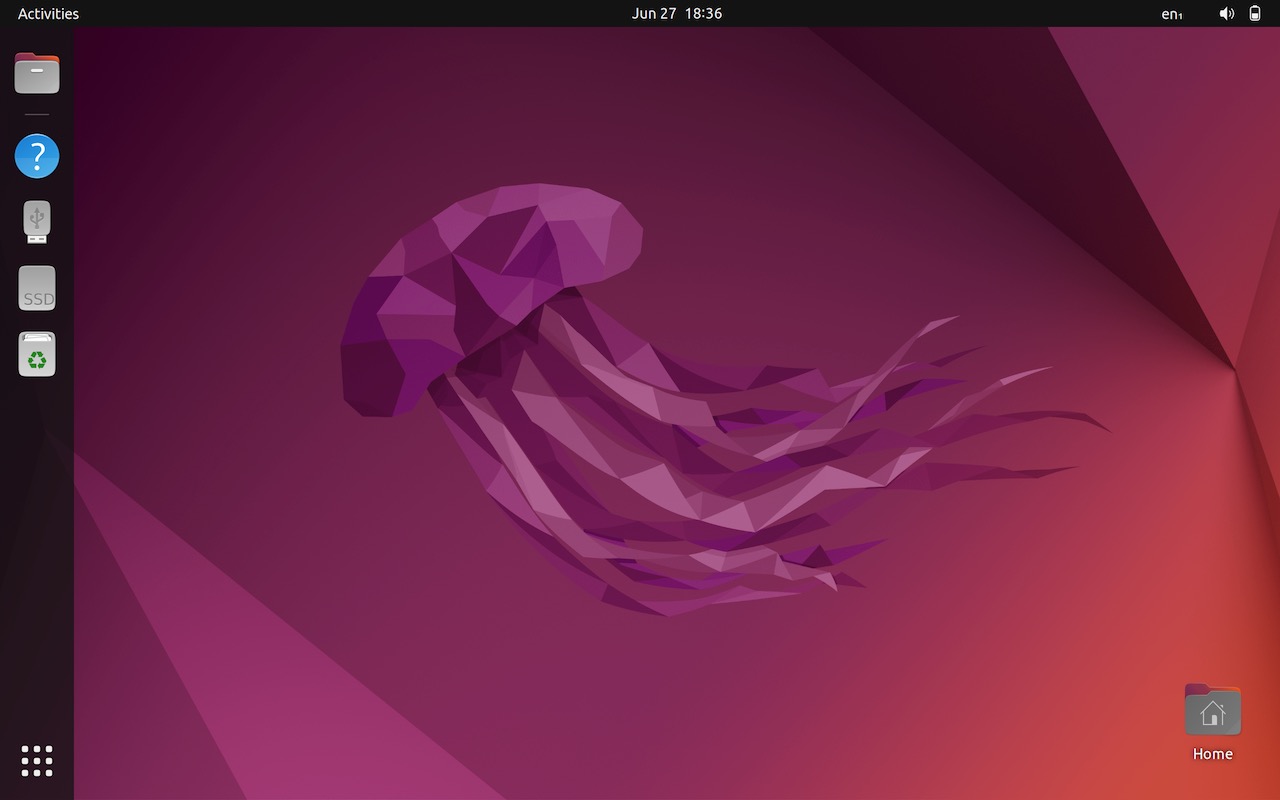
- Because I suffer from OCD the first thing I do is clear my work space. By right clicking the unneeded icons and "Remove from Favourites"
- Congratulations! Lets now do the last step and make sure the Ubuntu OS is fully air gapped.
-
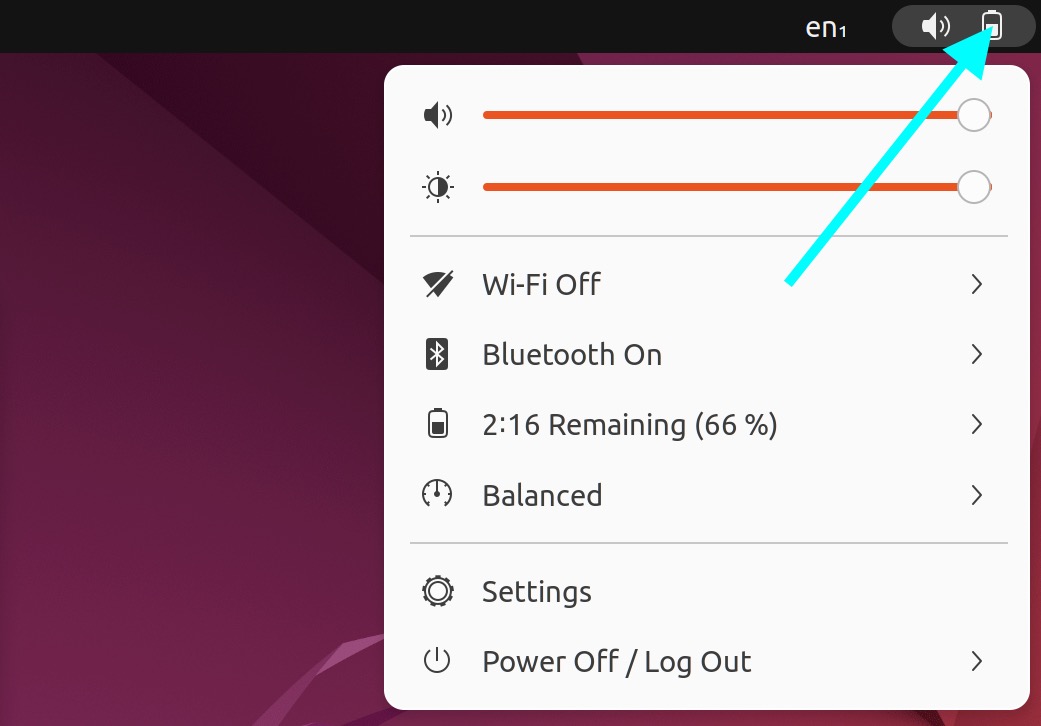
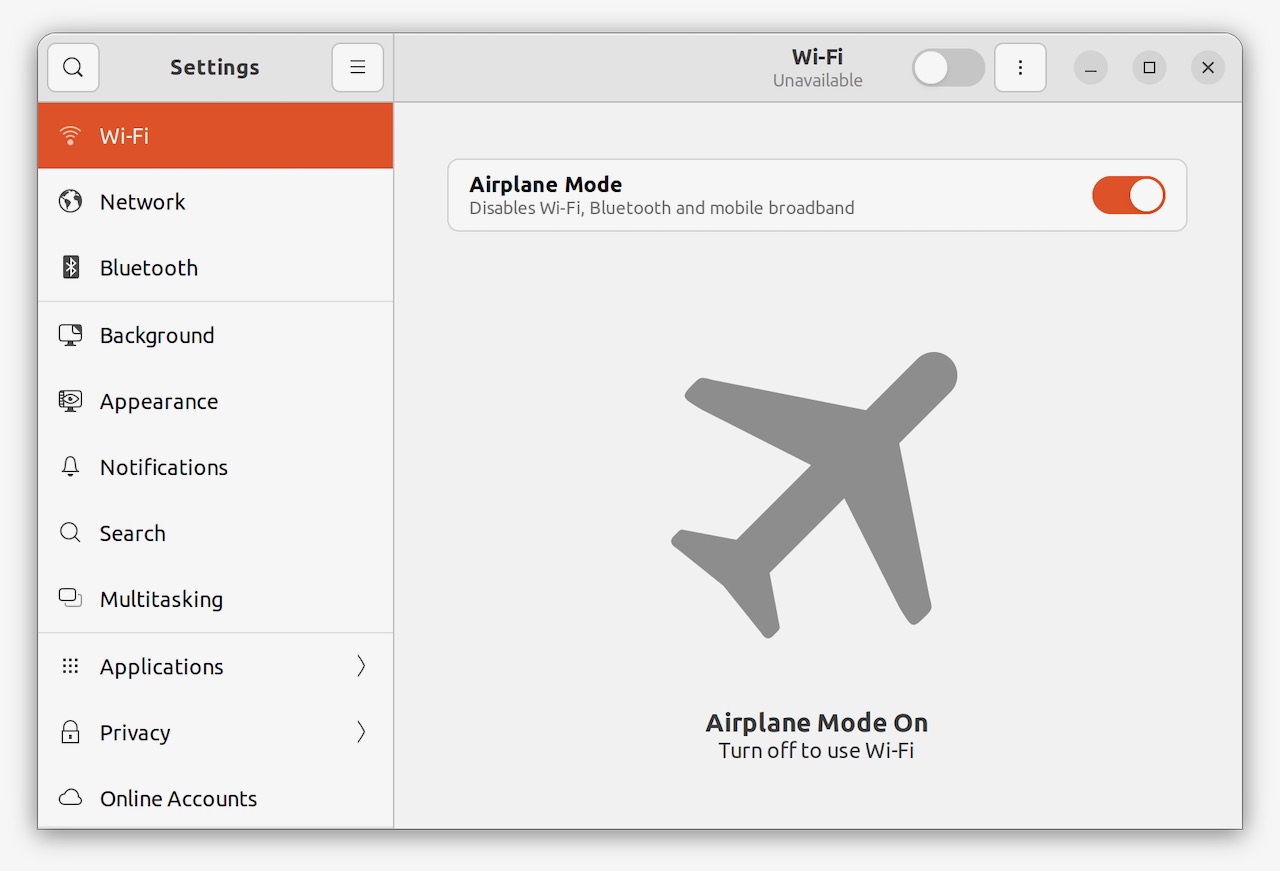
Now Ubuntu has booted we need to quickly put it into Airplane mode to be extra sure we are air gapped.
- Move your cursor to the top right of the home screen and click the battery icon and a drop down menu will appear
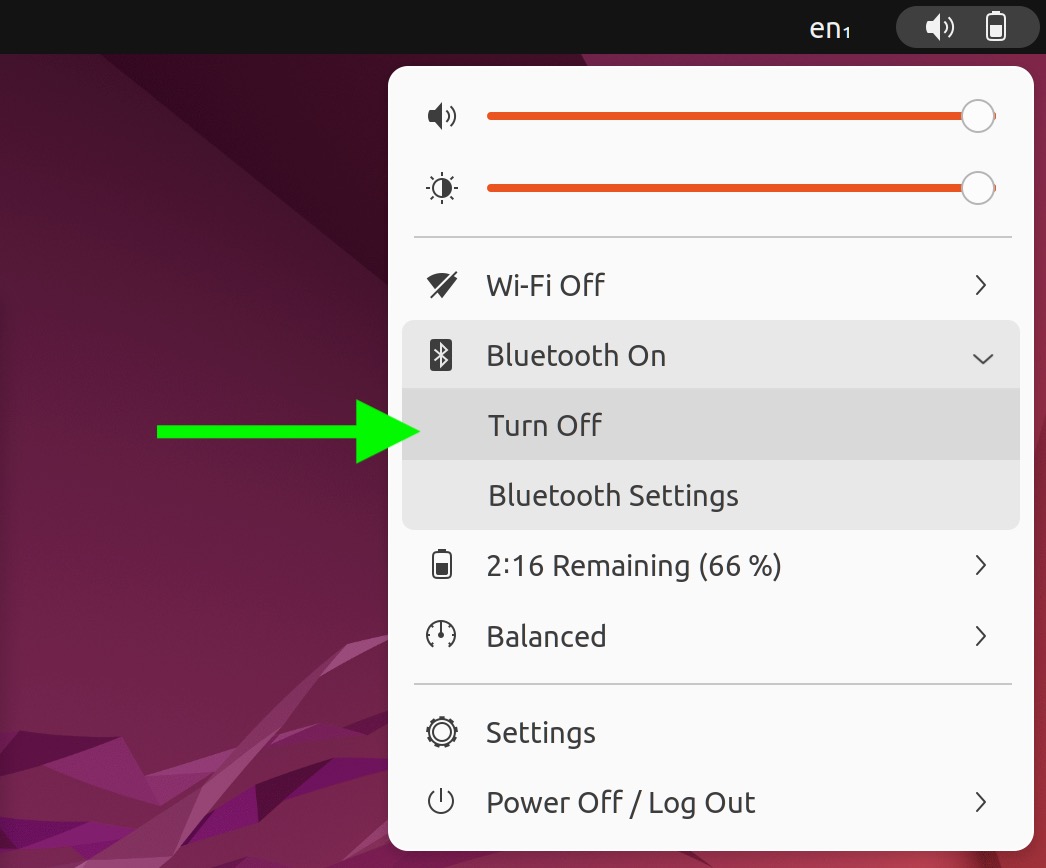
- With luck Wifi is already disabled, if not disable it first. Then scroll down to Bluetooth and "Turn Off" Bluetooth. You should now be in Airplane mode and fully air gapped.
- You can confirm your Ubuntu OS is in Airplane Mode by checking WiFi in Settings. You should also see a small airplane icon in the tool bar at the top of the home screen.
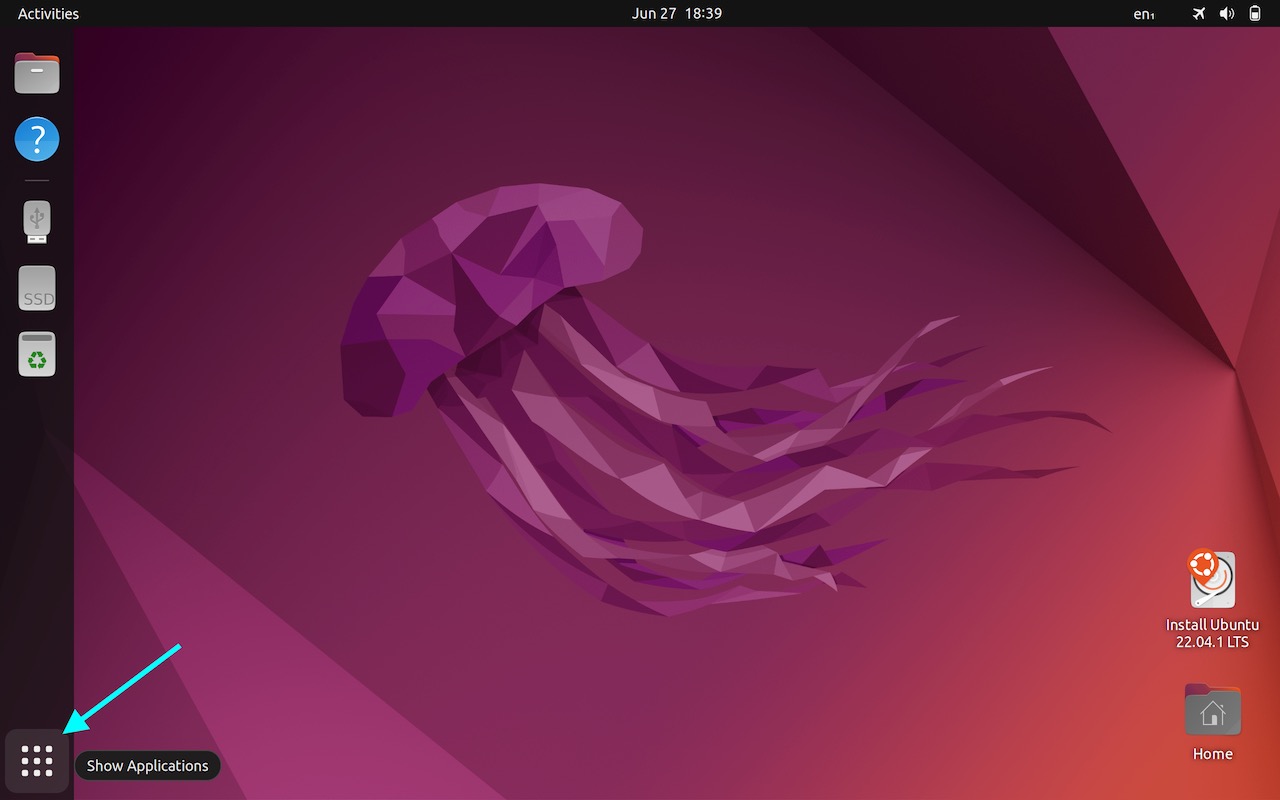
- Using your cursor scroll to the bottom left of the home screen and click the button with the nine dots "Show Applications"
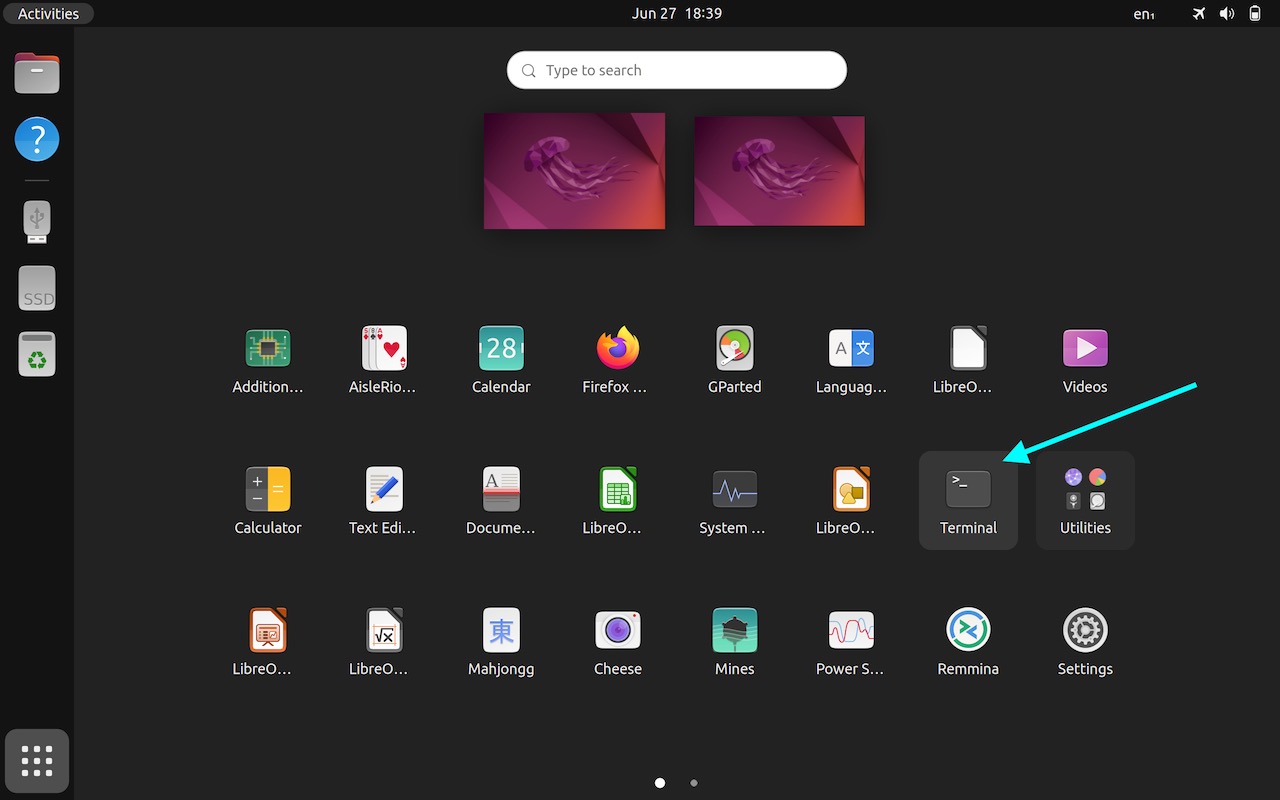
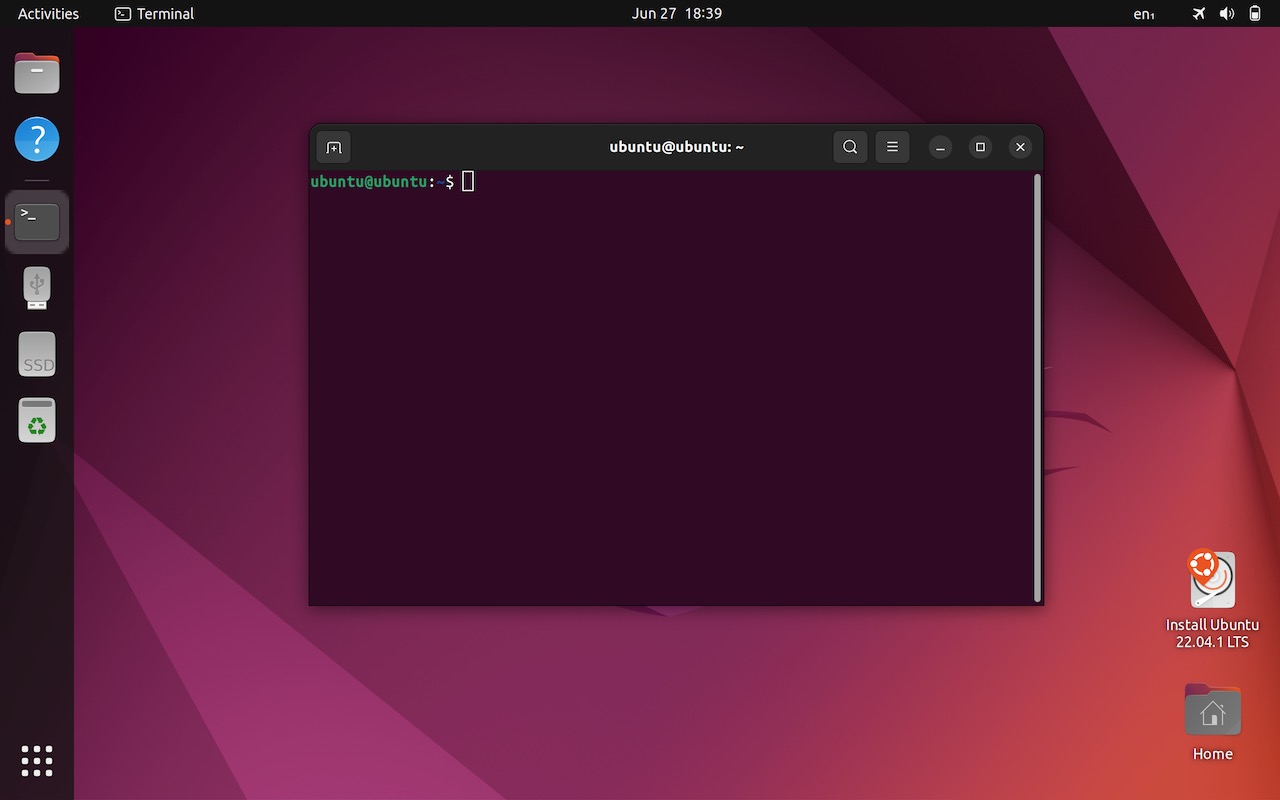
- This opens your Applications launchpad and it is here you will see the terminal icon. Click the icon and open the Terminal
- Congratulations! You are now ready to run Consensus Layer Withdrawal Protection (CLWP)
-
-
Below is the exact code you will find in the text file "CLWP-instructions.txt" we copied to the 2nd USB device earlier! It's good to familiarise yourself with the code.
CLWP-instructions.txt CLWP-instructions.txt # Copy the three files from your 2nd USB drive to the documents folder and work from there! # Paste your new public withdrawal wallet address here! --> # Open the terminal and copy and paste each line followed by Enter (Linux) cd '/home/ubuntu/Documents' tar -zxf ethdo-1.27.1-linux-amd64.tar.gz tar -zxf offline-preparation.json.mainnet.*.tar.gz cp offline-preparation.json.mainnet offline-preparation.json # now that ethdo is running and your offline file is ready. Edit the command below with your twenty four word mnemonic originally created when the node was activated, and your new consensus layer withdrawal address then run the command. #This will run a script that checks every node in the offline-preparation.json list until it finds your node. The resulting "change-operation.json" file will be cryptographically generated and the only code still unencrypted is the public wallet address. It is very important that you again verify that the withdrawal wallet address is correct - if it's incorrect, then delete the .json file, and run the command again (./ethdo validator credentials set --offline..) with the correct address to create a new .json file. You cannot edit the withdrawal wallet address in the .json file directly, as the signature will no longer be valid! ./ethdo validator credentials set --offline --mnemonic="your twenty four word seed phrase goes here" --withdrawal-address=0xY0UR4dressG0esH3re00000000007ffA7201727B6C # Lastly clear the terminal history history -c # Your document folder should now contain a file "change-operations.json" repeat this operation for each node and make sure the files are kept separately in folders and renamed with each node ID for example 123456.json # Note: Make sure you copy your .json files back to the 2nd USB drive before you power down Ubuntu or once powered down these files will be lost forever and you will have to start again!
If your resulting .json file code resembles the format below you know your node was found and your CLWP set withdrawal command was performed correctly. Double check the "validator index" is correct and triple check the "execution_address" is correct, because when this goes live on chain there is no way to change this address ever again!
change-operations.json [{"message":{"validator_index":"1234567","from_bls_pubkey":"0xa83acb5c8f56c7baba357778df7ab318819964a206f52408a0532db4a0b688619569041539a80929889beac5c7da6bc2","to_execution_address":0xY0UR4dressG0esH3re00000000007ffA7201727B6C"},"signature":"0xaeeb1587ff4b5dabb541d91889ab18c9be54680fe52f76d219f07be9544091c101b5fcc07d41d9ea6c236e2917c5ff9f128d238a4fdfc7b28ee7707f4fc5677df96ff039a68720bf2ea6410ae624f008357a24d7ca8cc0d37d253bb77caf4ee3"}] -
Below we will guide you through the steps to successfully uploading your .json files to GitHub.
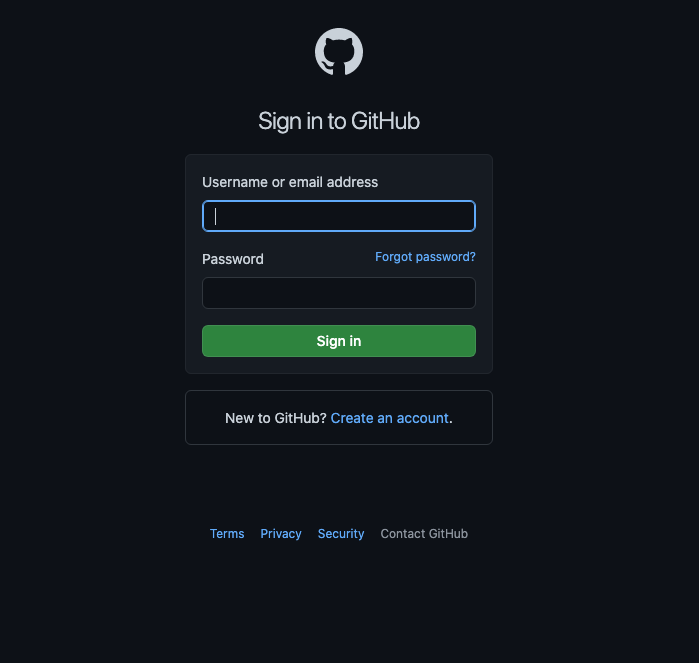
- Using your internet browser navigate to GitHub www.github.com
- If you have an account "Sign In" alternatively "Sign Up".
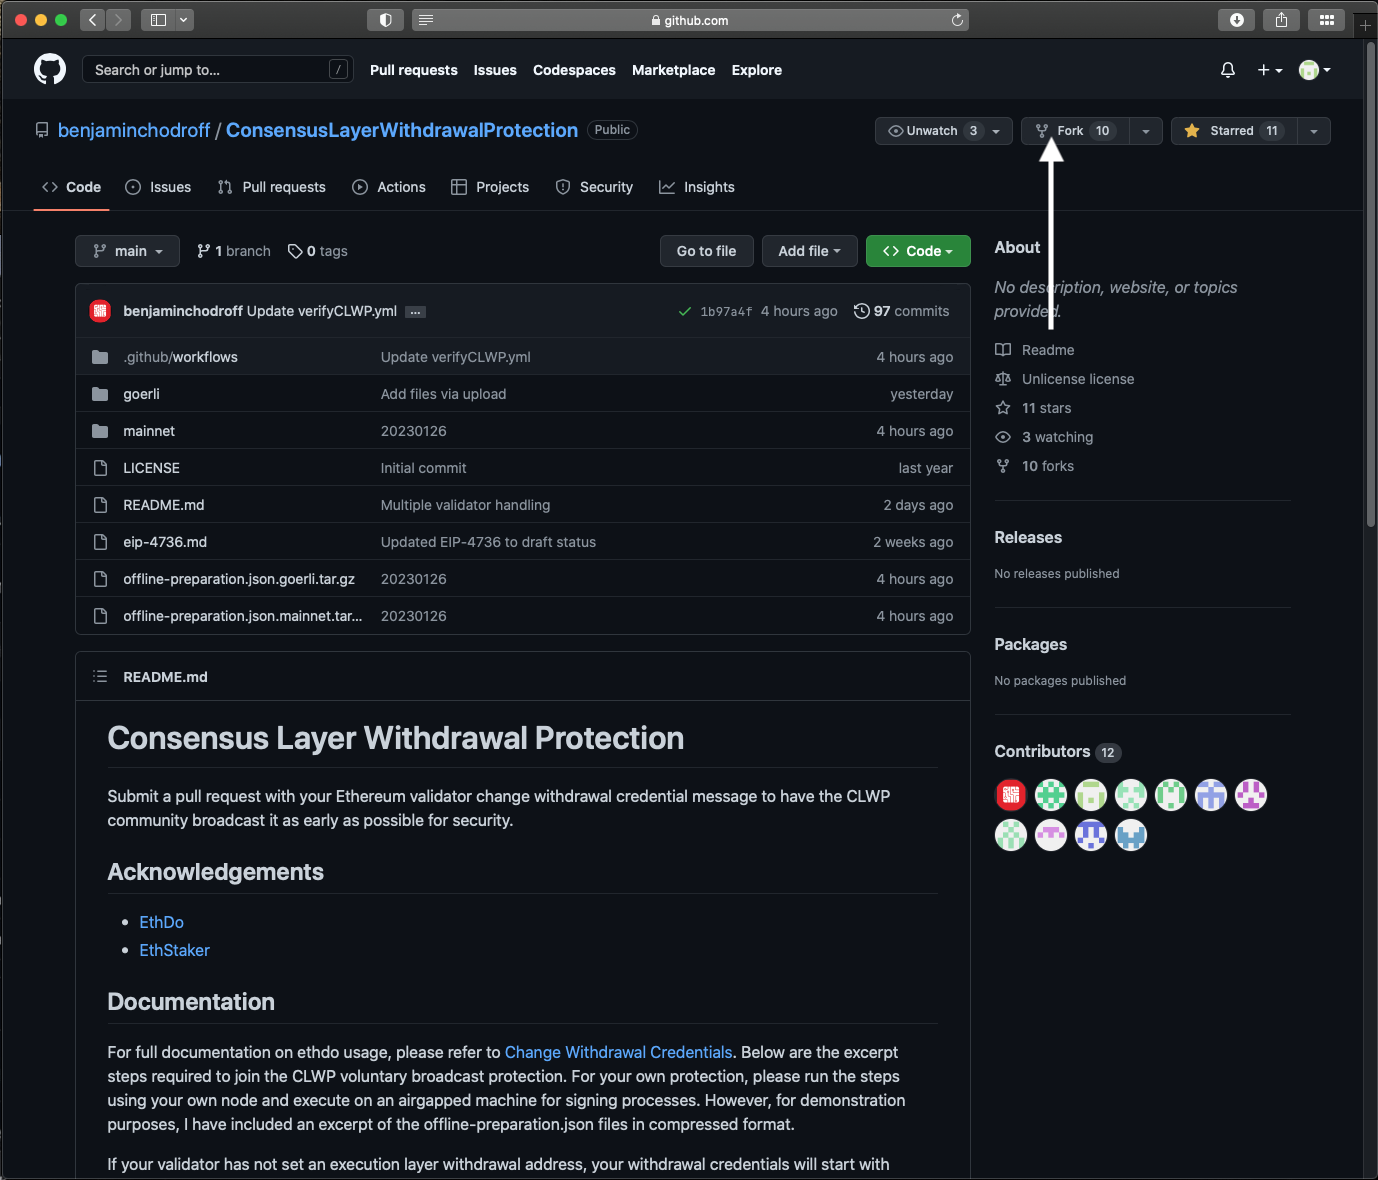
- Once signed in navigate to the CLWP repository found here --> CLWP GitHub. On this page you will see a tab labelled "Fork" click the drop down on the side of this tab!
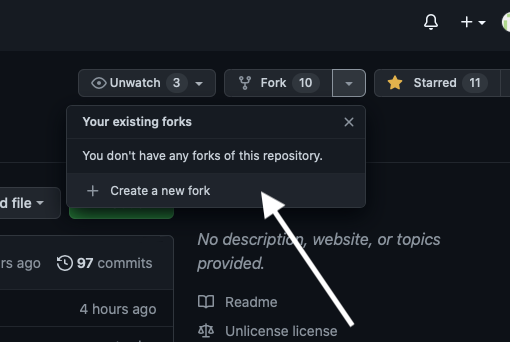
- If you click the text "Fork" and not the drop down you should see this message, this means you are yet to create a fork.
- By correctly clicking the drop down icon you should be able to select "+ Create a new fork"
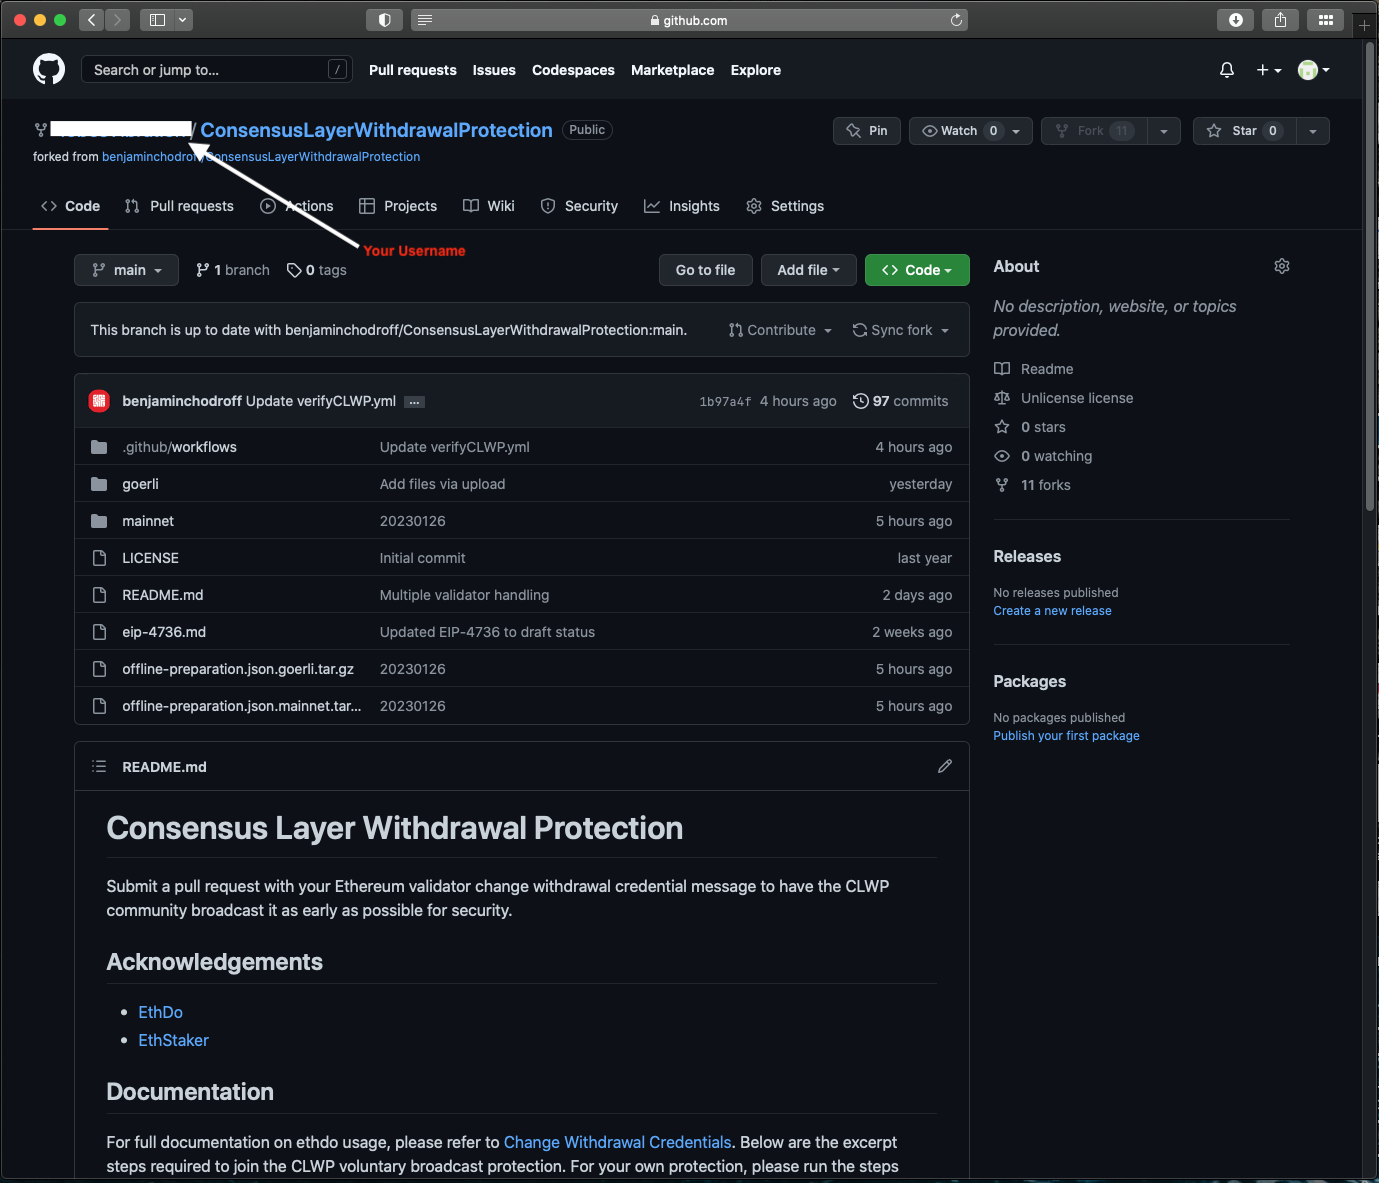
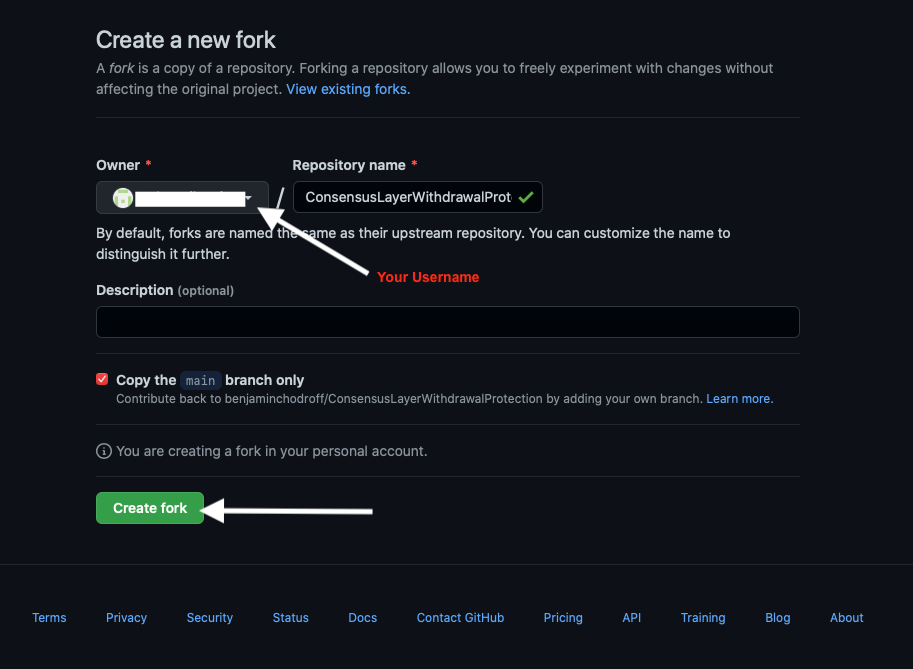
- For privacy purposes we have blanked out the username, but make sure your username is displaying and then click the green button "Create Fork"
- You can now confirm you have created a new Branch as your username should be displayed before /ConsensusLayerWithdrawalProtection this means you have correctly forked and are now in your own repository.
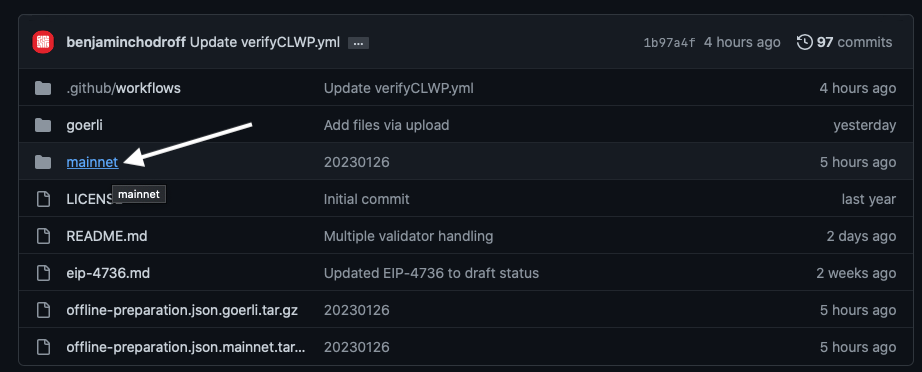
- On this page you will see a folder "mainnet" click this to open your personal mainnet page.
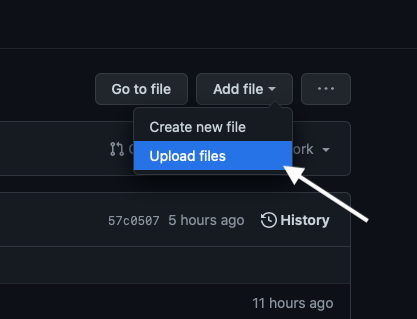
- Now you are inside your mainnet folder we want to use the top right tab "add file" and use the drop down to select "Upload Files".
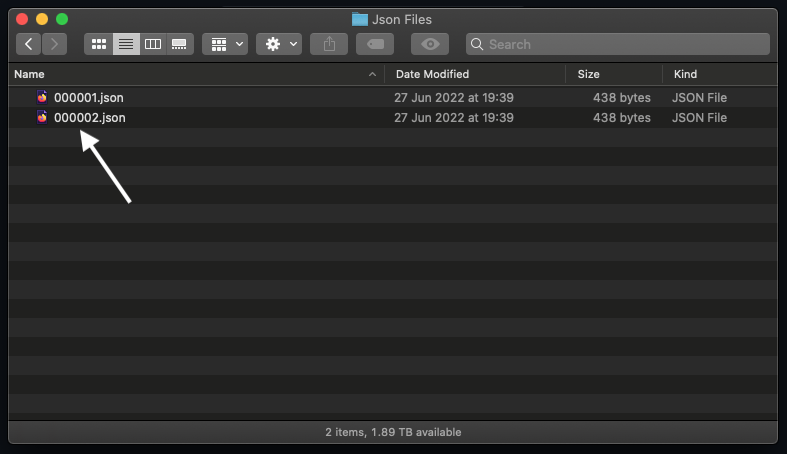
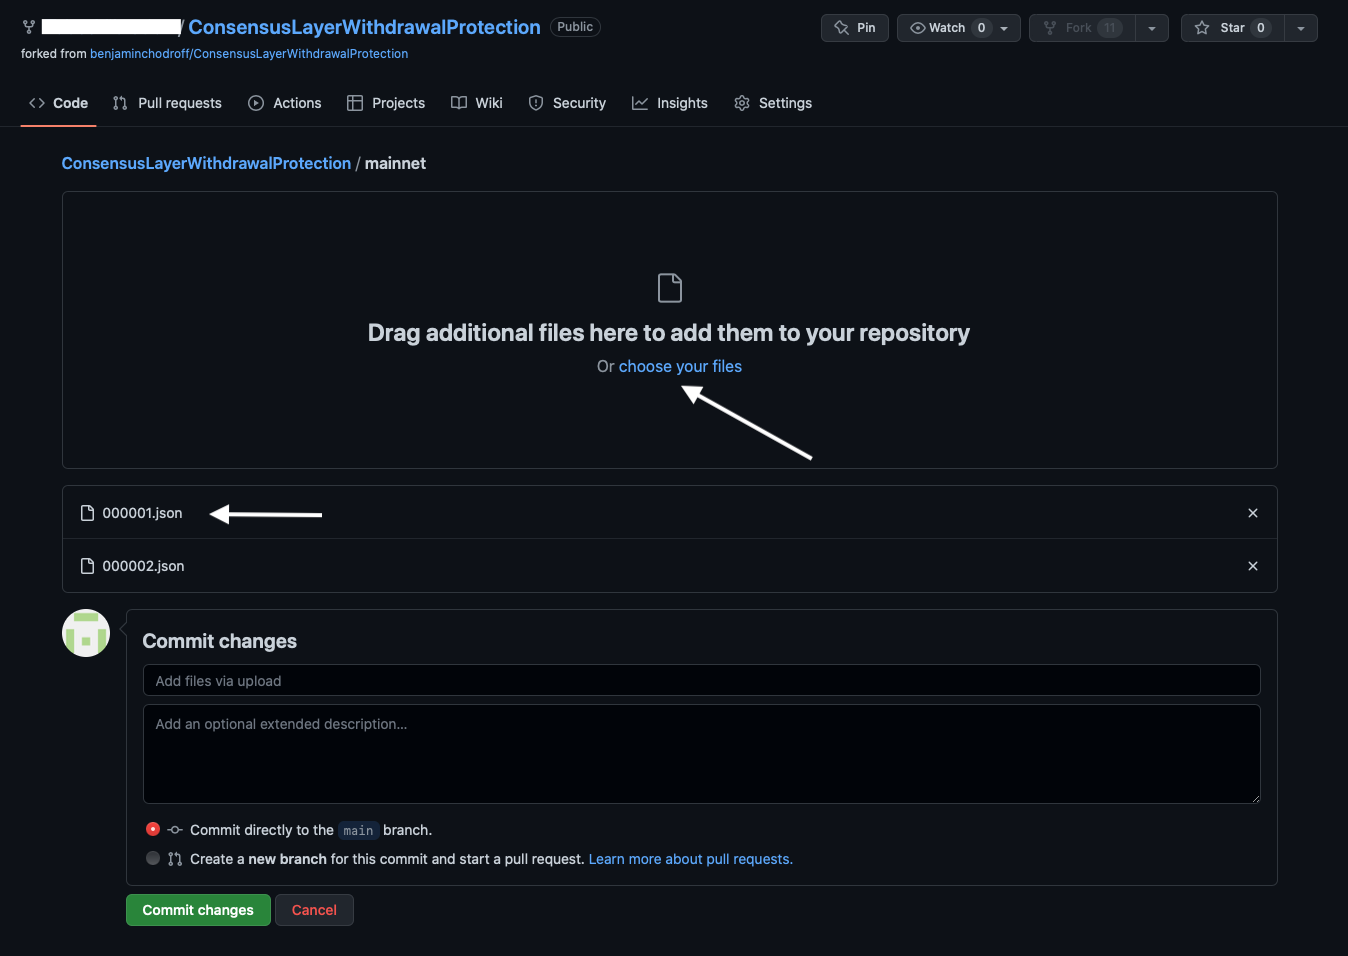
- Before uploading make sure your .json files are named correctly! Each .json file should be labelled with the correct validator index for example 123456.json. You can confirm by opening the .json file using a text editor.
- Now lets return to the mainnet page and click "choose your files" from here you can upload one .json or multiple .json files, just make sure each file is correctly labelled! Once uploaded you will see your files listed in order as you see on the image below.
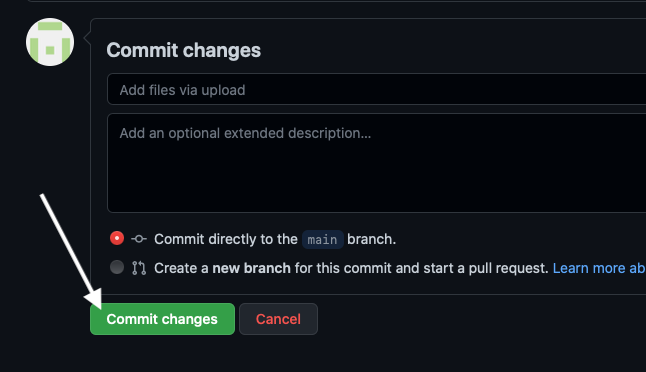
- The next step is to simply click the green button "Commit changes" you do not need to touch or fill in any of these text fields. But make sure "Commit directly to the main branch" tab is selected as seen in the image below. And click commit changes.
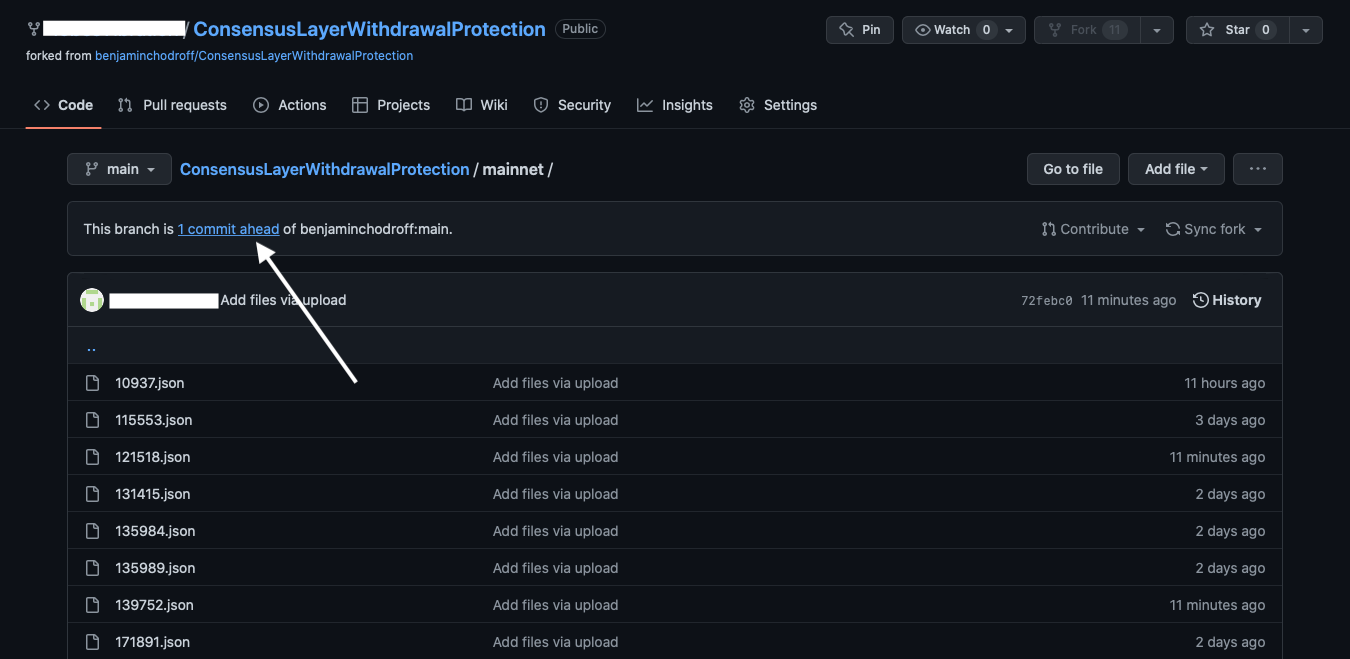
- You will now be redirected back to your repository, you can double check this by checking your username is displayed before /ConsensusLayerWithdrawalProtection as we explained previously on step 7.
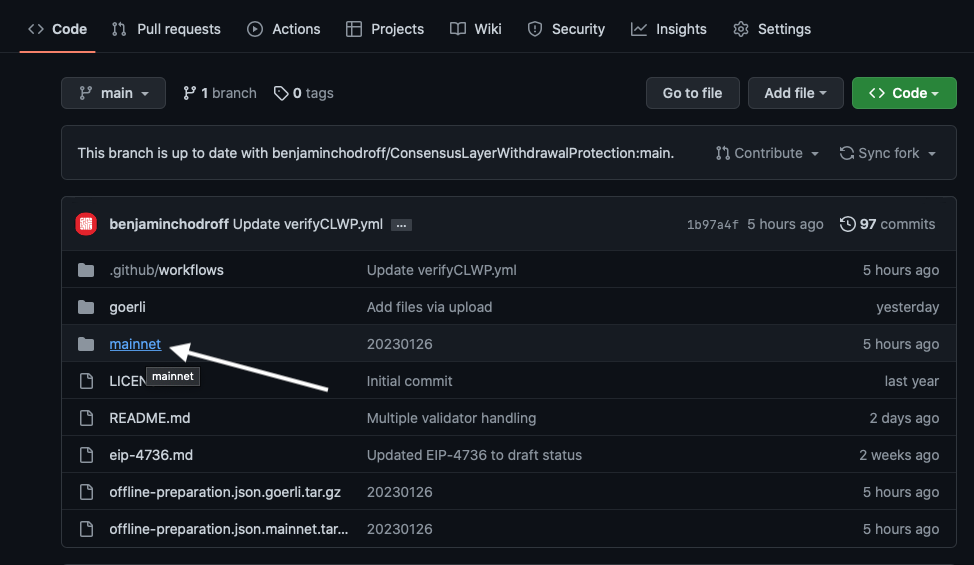
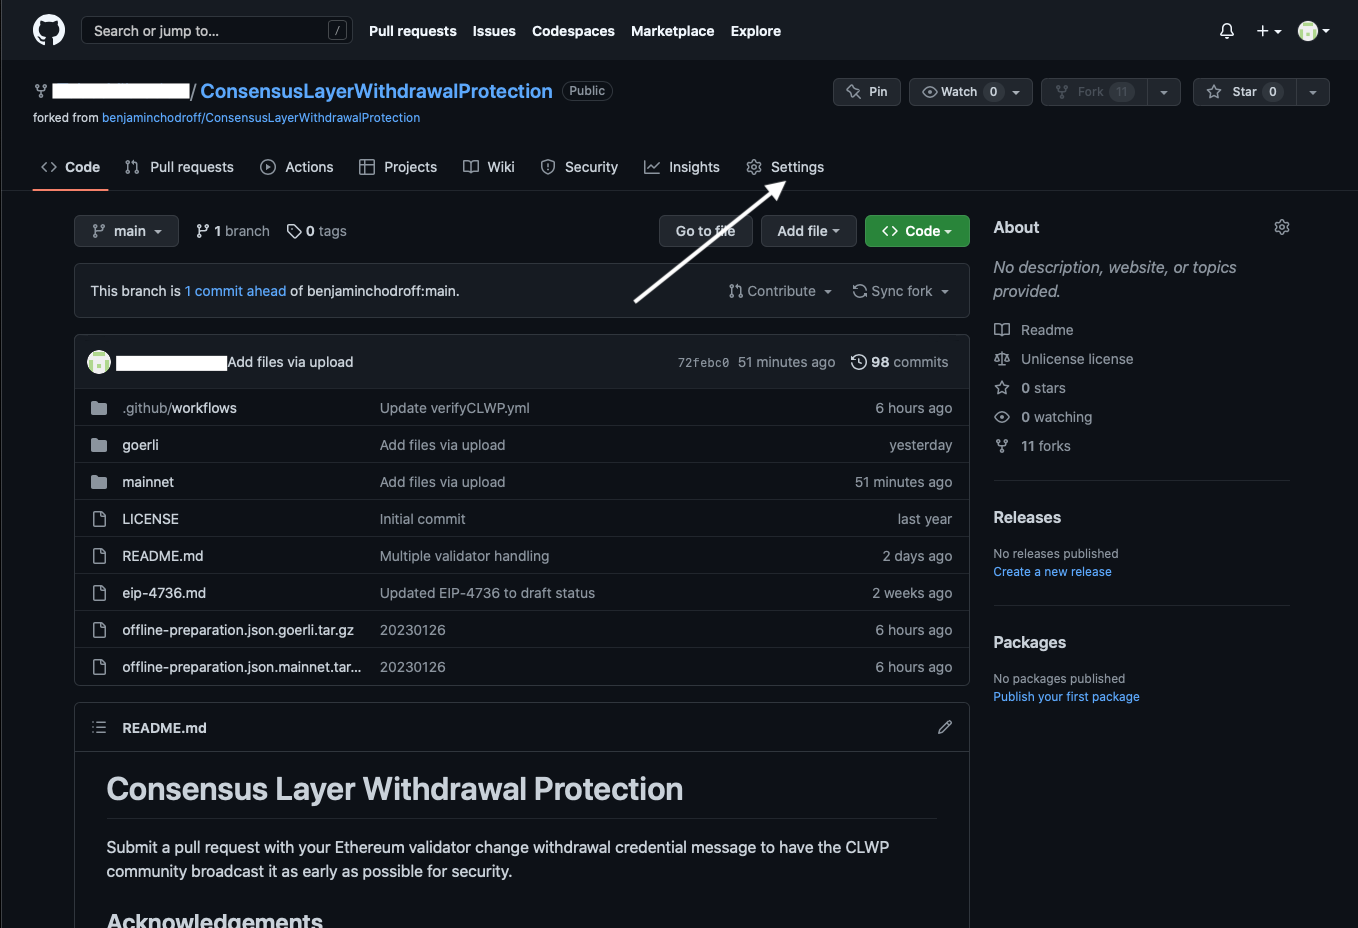
Once again click the "mainnet" folder so we can complete the commit process. - On this page you should see "This branch is 1 commit ahead of benjaminchodroff:main." Click the underlined text "1 commit ahead".
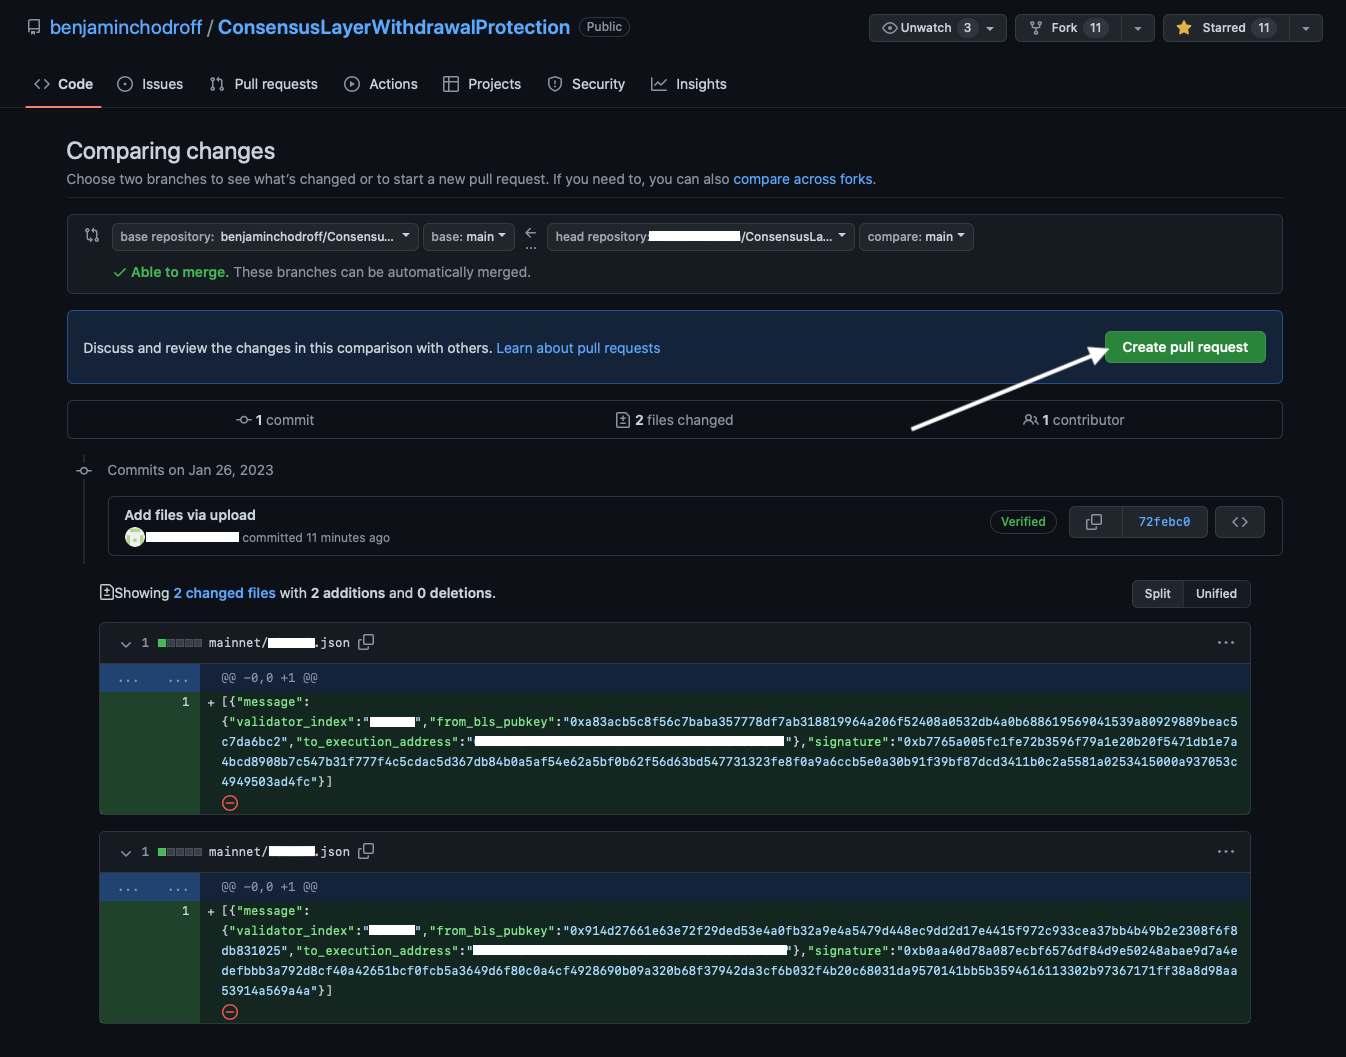
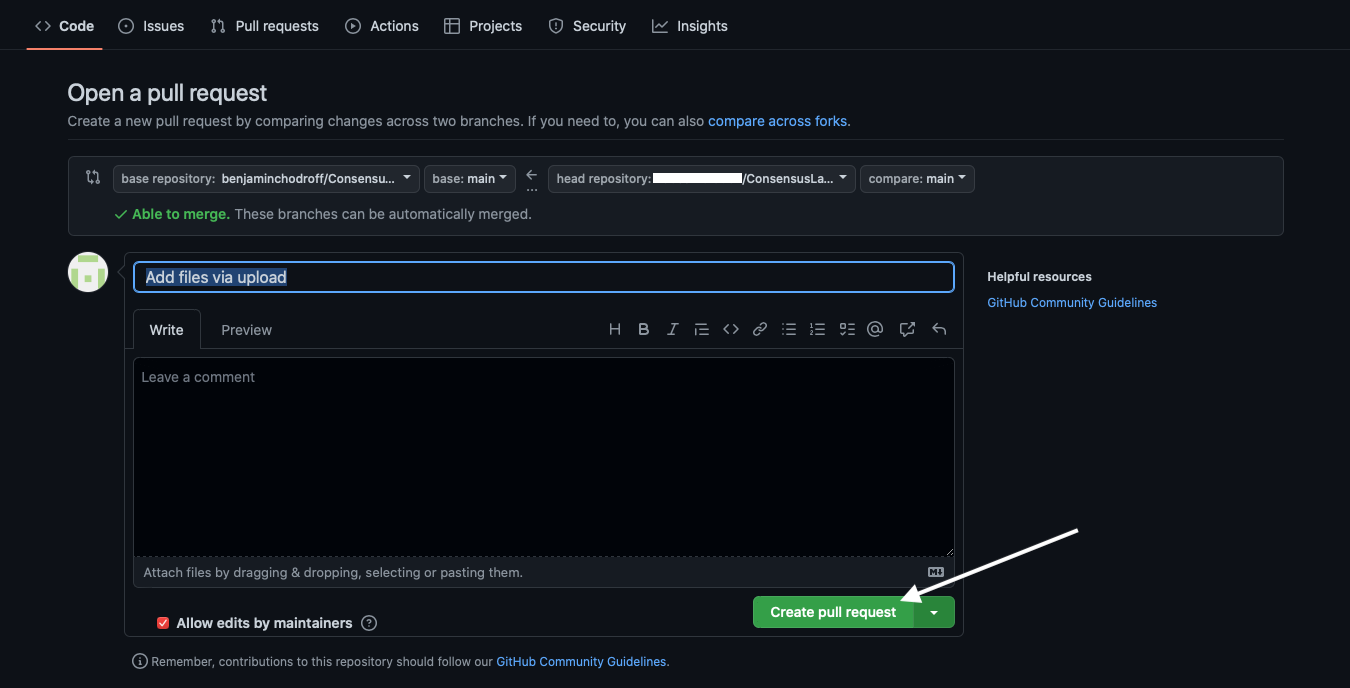
- The next page should look like the one we're displaying below. For privacy we have blanked out some private data, but this is your last chance to double check your validator index, filename and public withdrawal address is correct. When you are sure everything is correct. Click the green button "Create pull request".
- The next page should look like the image below! Click the green button "Create pull request".
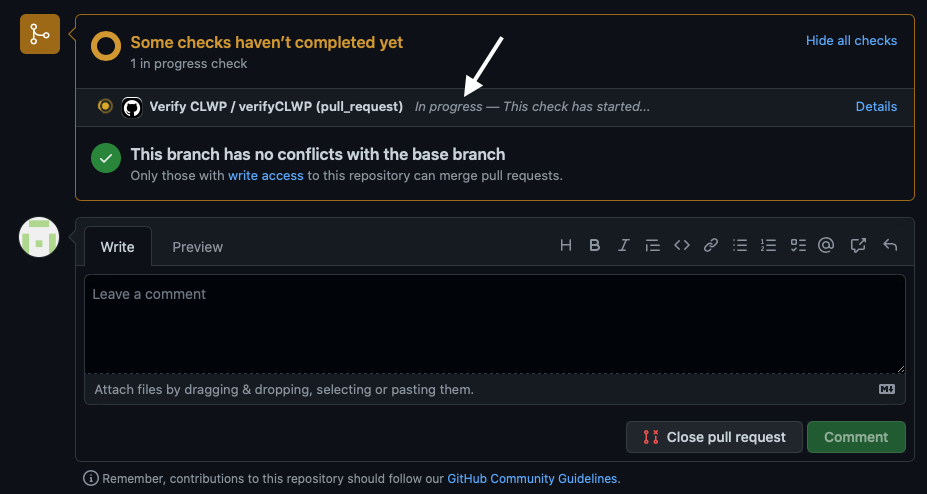
- You will now see a page with the content displayed below. This means your commit was successful and is now in a queue waiting to be verified by CLWP admin.
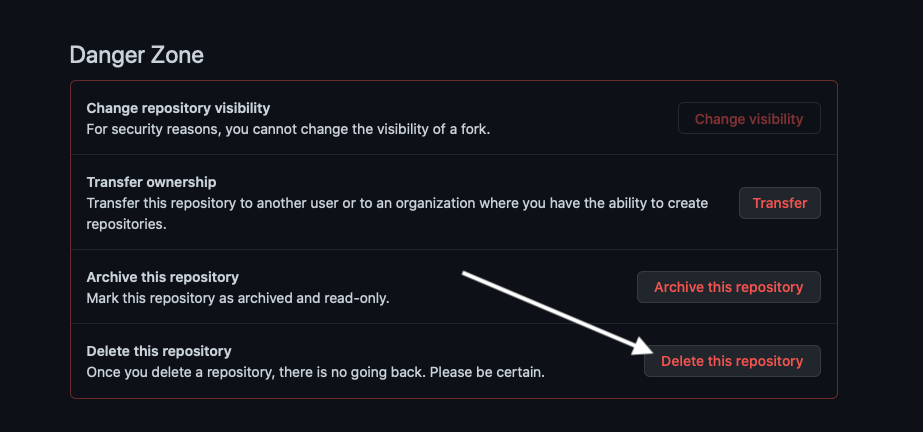
- If you have followed all these steps and think you have made a mistake. It's not a problem! You can simply click the settings button on your Branch home page.
- Scroll to the very bottom of the settings page and you will find a button labelled "Delete this repository". You can delete your branch and start the process again. Please make sure you are 100% certain you have followed the steps properly or your submission will be rejected upon review and you will be automatically informed via an email automatically generated and sent to you from GitHub.
To be clear we have an automated system that will check the validity of your files and signature, if an error is spotted you will be informed once CLWP admin has confirmed the issue and deleted the Branch. If at any time you need help, reach out to a White hat admin at the CLWP discord or dm us via our twitter page found here --> www.twitter.com/EthCLWP


